
If you’re running a WooCommerce store and want your product pages to stand out, you’ve probably asked yourself: “How to Create WooCommerce Page in Elementor Pro?” Good news—you don’t need to be a developer or use complex code to make stunning product layouts. With Elementor Pro, you can design fully customized product pages that match your brand and improve your customer’s shopping experience.
In this step-by-step guide, we’ll show you exactly how to create a custom WooCommerce product page using Elementor Pro.
Why Customize Your WooCommerce Product Page?
Default WooCommerce product pages can feel generic and don’t always align with your brand’s identity or user experience goals. By learning how to create a custom WooCommerce product page in Elementor Pro, you can:
- Improve your store’s visual appeal
- Highlight product features more effectively
- Increase conversion rates with strategic design elements
- Ensure consistency with the rest of your website
- Elementor Pro
- Divi
- Essential Addon
- Templately
- WPForms
- Fluent Forms
- ACF Pro
- Prime Slider
- Woostify theme
How to Create WooCommerce Page in Elementor Pro-Step By Step Guide
Follow these simple steps to build your own product page design from scratch.
Step 1: Make Sure You Have the Right Tools
Before you begin, make sure the following are installed and activated:
- Elementor Pro
- WooCommerce
- A WordPress theme that works well with Elementor (like Hello or Astra)
Step 2: Open Elementor Theme Builder
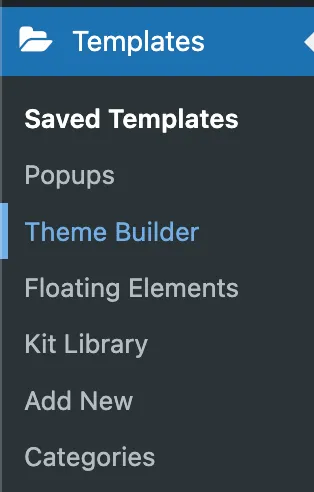
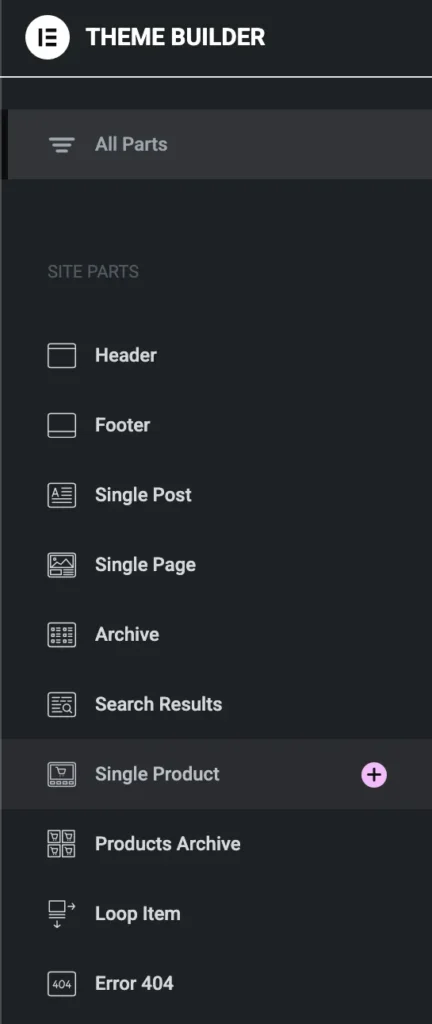

- From your WordPress dashboard, go to:
- Templates → Theme Builder.
- Click the “Single Product” tab.
- Click “Add New”, choose Single Product, and name your template.
Step 3: Choose a Template or Start From Scratch
You’ll be prompted to select from Elementor’s pre-designed WooCommerce product templates. You can:
- Import one to customize it, or
- Start from a blank canvas for full design control.
Step 4: Add WooCommerce Product Widgets
Elementor Pro includes special widgets designed for WooCommerce. To build your layout, drag in widgets such as:

- Product Title
- Product Image / Gallery
- Product Price
- Add to Cart Button
- Product Rating
- Product Description
- Product Stock
- Product Meta (SKU, categories, etc.)
- Product Tabs (for reviews, additional info)
Tip: Use sections and columns to create a layout that feels clean and user-friendly.
Step 5: Customize the Design
Use Elementor’s powerful styling options to match your brand:
- Adjust fonts, colors, spacing, and backgrounds
- Add icons, badges, trust signals, or product benefits
- Make the page mobile responsive using the responsive editing mode
You can also use dynamic content so that your design automatically populates product-specific details.
Step 6: Set Display Conditions
After designing your custom WooCommerce product page:
- Click Publish.
- Set the Display Conditions — for example:
- Apply to All Products
- Or only to specific categories or product types
- Apply to All Products
- Click Save & Close.
Now, all selected products will use your new custom layout!
Bonus Tips for Better Product Pages
- Add upsell or related products below the main product.
- Include trust-building elements like reviews, badges, and guarantees.
- Use sticky add to cart buttons for easier purchasing on mobile.
- Add product videos or interactive galleries to increase engagement.
- Elementor Pro
- Divi
- Essential Addon
- Templately
- WPForms
- Fluent Forms
- ACF Pro
- Prime Slider
- Woostify theme
Conclusion
Knowing how to create a custom WooCommerce product page in Elementor Pro gives you a serious edge as an online store owner. Instead of relying on default WooCommerce layouts, you can create beautifully branded pages that better showcase your products, increase conversions, and provide a superior shopping experience.
Whether you’re selling digital downloads, physical products, or custom services, Elementor Pro makes it easy to build product pages that not only look great—but also perform.

