
To set up a Conditional Popup in Elementor Pro: (1) go to Templates → Popups and click Add New, (2) design your modal layout (lead magnet, discount offer, or alert), (3) click the arrow next to Publish and select Display Conditions (e.g., target specific pages or categories), (4) configure Triggers (On Page Load, On Scroll, On Exit Intent), and (5) set Advanced Rules (e.g., show only to new visitors or hide for logged-in users).
Key Takeaways
- Elementor Popup Builder allows exact triggers (exit intent, scroll depth, time on page, click).
- Set display conditions by page, post type, user login status, or referrer URL.
- Configure frequency caps (e.g., show once every 7 days) to prevent annoying repeat visitors.
- Ensure popups comply with Google mobile interstitial guidelines by delaying triggers on smartphones.
Popups are one of the most powerful tools for grabbing attention, generating leads, and boosting conversions. But what if you only want to show a popup under certain conditions—like after a user scrolls down, clicks a button, or tries to exit your site?
That’s where conditional popup in Elementor Pro come in.
In this tutorial, you’ll learn exactly how to create and control popup in Elementor Pro based on specific user behaviors and page conditions—no code required.
How to Set Up Conditional Popups in Elementor Pro
What You Need
- A WordPress site with Elementor Pro installed and activated
- At least one page or template where the popup should appear
Step 1: Create a Popup
- Go to your WordPress dashboard
- Navigate to Templates > Popups > Add New
- Name your popup and click Create Template
- Choose a pre-designed popup or build one from scratch using Elementor
Design your popup just like a regular Elementor layout — add text, buttons, forms, images, countdown timers, etc.
Step 2: Set Display Conditions
After designing your popup, click the Publish button. You’ll be prompted to set:
1. Display Conditions
This controls where your popup appears.
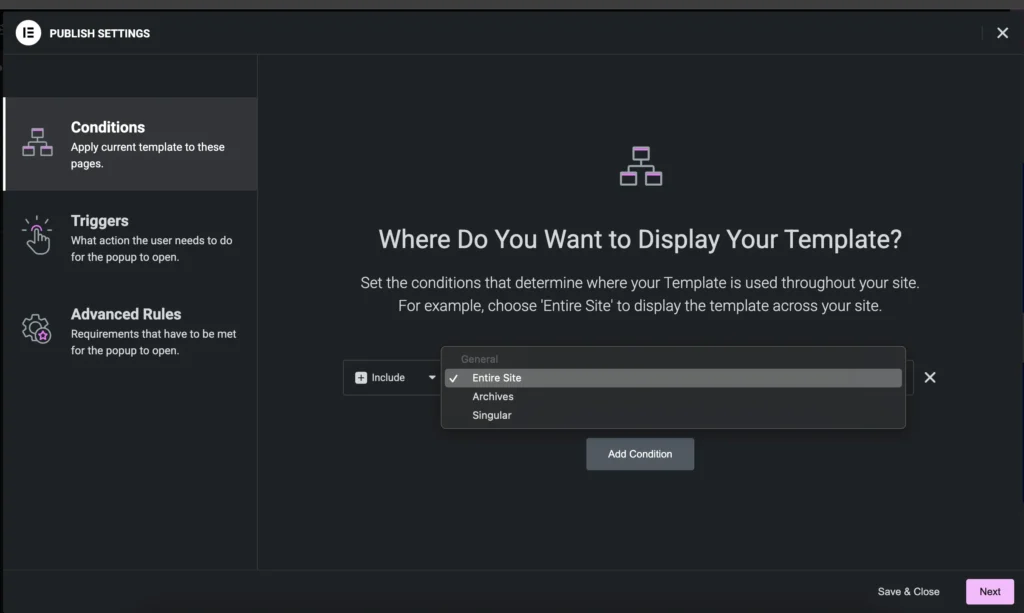
- Choose specific pages, posts, or categories
- Example: Show only on the homepage or blog posts
Example: Show popup only on the “Pricing” page
Step 3: Set Triggers
Triggers control how and when the popup appears.
Click “Add Trigger” and choose from the following options:
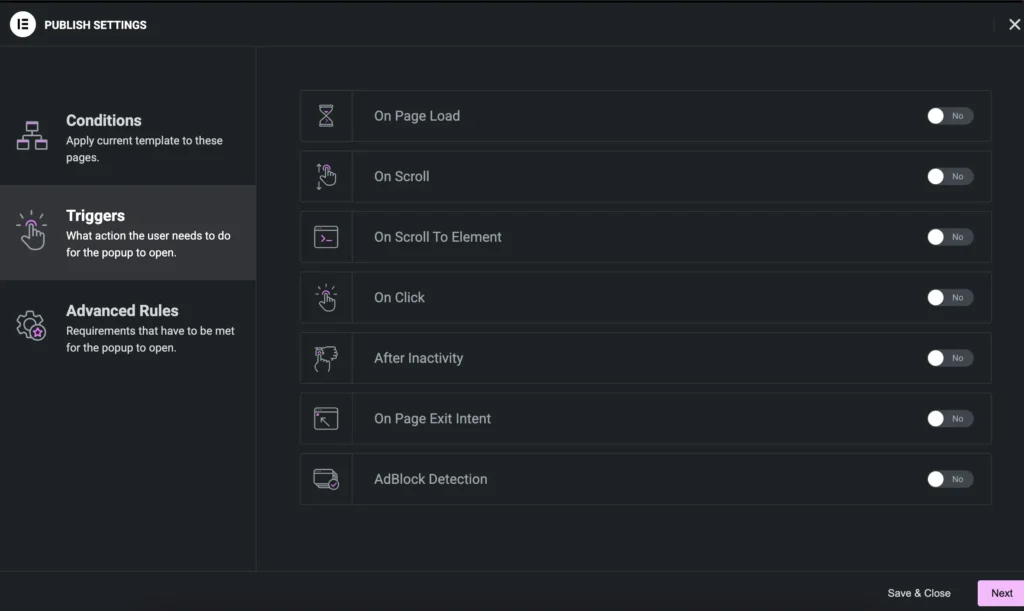
- On Page Load – Show after a delay (e.g., 5 seconds)
- On Scroll – Show after scrolling a percentage of the page
- On Scroll to Element – Target a specific section or widget
- On Click – Show when a user clicks a button or link
- After Inactivity – Show after a user is idle for a set time
- On Page Exit Intent – Show when user moves cursor to close tab
🎯 Want to show a popup when someone clicks a “Subscribe” button? Use the On Click trigger and link it to that button.
Step 4: Add Advanced Rules (Conditional Logic)
Now it gets interesting. Advanced Rules let you set conditions like:
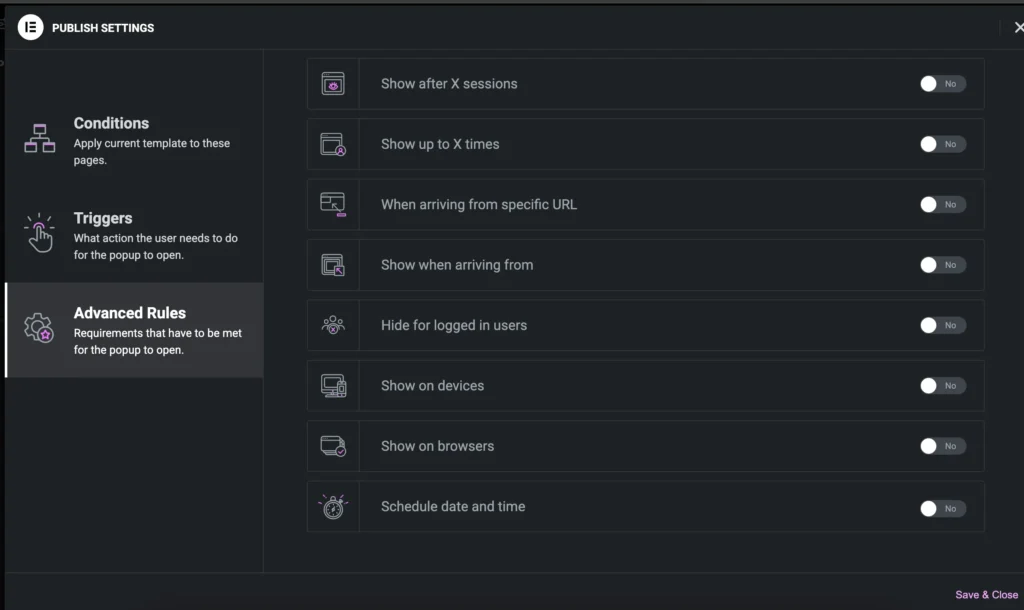
- Show after X page views
- Show after X sessions
- Only show to logged-in or logged-out users
- Hide for users who have already seen the popup
- Limit popup to certain devices (desktop, mobile, tablet)
Example: Show popup only to new visitors on mobile after 3 seconds of inactivity.
Step 5: Save and Test Your Popup
Click Save & Close after setting all conditions.
Then, visit the page where the popup is supposed to trigger. Make sure everything works correctly:
- Popup shows at the right time
- Appears only on targeted pages/devices
- Doesn’t reappear if user already interacted
Pro Tips
- Use exit-intent popups for cart recovery or newsletter signup
- Combine scroll + inactivity triggers for engaged users
- Use Elementor Dynamic Tags to personalize popup content (e.g., user name or location)
Special Features of Conditional Popups in Elementor Pro
1.Fully Customizable Design
Build popups using Elementor’s drag-and-drop editor:
- Add forms, countdowns, images, videos, or custom layouts
- Full control over animations, size, position, and entrance effects
- Match your brand style with advanced typography and color tools
2. Mobile-Responsive & Device Targeting
- Design popups to look great on all screen sizes
- Show or hide popups based on device: desktop, mobile, or tablet
- Create separate popups tailored to each device experience
3. Dynamic Content Integration
- Use Elementor Dynamic Tags to personalize content based on user data (like name, location, or login status)
- Create more personalized, engaging messages that convert
4. Built-In Integrations
- Connect forms in your popups to email marketing services like:
- Mailchimp
- ActiveCampaign
- ConvertKit
- GetResponse
- Webhooks & Zapier
5. Popup Templates Library
- Access pre-built popup templates inside Elementor
- Categories include lead capture, promotions, announcements, exit-intent offers, and more
6. Exit-Intent Technology
- Detect when a user moves their cursor toward the browser’s close button (on desktop)
- Great for last-chance offers or capturing abandoning visitors
7. No Extra Plugins Needed
- All features are built-in with Elementor Pro
- Avoid slowdowns or compatibility issues from third-party popup plugins
Conclusion
Setting up conditional popup in Elementor Pro gives you powerful control over how and when visitors see your message. Whether you’re growing your email list, promoting a sale, or offering help just before a user leaves, smart popup targeting ensures your message hits at the right time.
With Elementor’s easy interface, you can build stylish, behavior-based popups in minutes—no code, no headache.
The 3 Pillars of Elementor Pro Popup Publishing Settings
Elementor Pro provides the most powerful visual popup builder in the WordPress ecosystem, split into three precise targeting layers:
1. Conditions (Where It Appears)
- Entire Site: Displays across all pages.
- Specific Archives / Categories: Show a footwear discount popup exclusively to visitors browsing the Shoes category.
- Single Post Types: Trigger technical whitepaper downloads only on Case Study posts.
2. Triggers (When It Appears)
| Trigger Type | Firing Mechanism | Best Used For |
|---|---|---|
| On Page Load | Fires after X seconds delay | Age verification modals, urgent site maintenance notices. |
| On Scroll (50%+) | Fires when visitor scrolls past half of page | Engaged reader newsletter opt-ins, related guide offers. |
| On Exit Intent | Fires when cursor moves toward browser close tab | Last-chance discounts, cart abandonment recovery. |
| After Inactivity | Fires when user pauses for 30+ seconds | Re-engaging distracted shoppers. |
3. Advanced Rules (Who Sees It)
- Show After X Page Views: Require visitors to read at least 2 pages before showing an opt-in.
- Show Up To X Times: Cap impressions (e.g., max 1 time per week) to prevent annoying repeat visitors.
- Hide for Logged-In Users: Never show registration promos to existing customers or team members.
- Show on Specific Devices: Disable on mobile to maintain Google mobile-friendly compliance.
Need custom conversion rate optimization, high-converting popup funnels, or speed-optimized WordPress design? Explore our marketing and web services at CV World.
Frequently Asked Questions
Ready to Build Professional Websites Faster?
Supercharge your WordPress design workflow with 100+ premium widgets, theme builder capabilities, and dynamic WooCommerce templates.
Not if configured properly. Google penalizes full-screen popups that appear immediately upon mobile page load. Use exit-intent or 50% scroll triggers, or use Advanced Rules to display modals on desktop only.
Yes. Under the button widget’s Link setting, click Dynamic Tags → Actions → Popup, then select your popup and set action to Open Popup.
In Advanced Rules, enable Show up to X times and set it to 1 time, or configure Show after user closed X times.
Yes. Elementor Pro forms inside popups process submissions via AJAX without refreshing the page, displaying a confirmation message or closing the modal automatically.
No. When implemented using modern clean-code standards, responsive Flexbox containers, and server-side caching, your website maintains rapid sub-second loading speeds and easily passes Google Core Web Vitals assessments.
Need Custom Elementor Pro Development or Speed Optimization?
Partner with CV World lead WordPress engineers for custom Theme Builder development, WooCommerce integrations, and guaranteed 90+ Core Web Vitals.