

To set up a Custom Thank You Page for Elementor Pro Forms: (1) create and design a dedicated page (e.g., /thank-you/) thanking the user and explaining next steps, (2) open the page containing your Elementor Form, (3) in Form Settings, expand Actions After Submit and add Redirect, (4) paste your thank you page URL into the newly appeared Redirect settings tab, and (5) append conversion tracking scripts (Google Ads, Meta Pixel) to the thank you page.
Key Takeaways
- Redirect form submissions to dedicated Thank You pages for accurate Google Ads conversion tracking.
- Pass lead names dynamically to personalize post-submission greetings.
- Provide clear next steps, scheduling calendars, or download links to maintain momentum.
- Ensure Thank You pages are marked with noindex tags to prevent accidental organic indexing.
If you’re using Elementor Pro to build high-converting forms, knowing how to set up thank you pages for Elementor Pro forms is a must. A custom thank you page not only confirms the successful form submission but also offers a great opportunity to engage users further—whether it’s delivering a special offer, providing a download, or guiding them to the next step.In this tutorial, we’ll walk you through exactly how to set up custom thank you pages for Elementor Pro forms, step-by-step. You’ll learn how to redirect users after submission, why thank you pages matter, and how to fully customize the experience to match your brand and goals.
Why Use a Custom Thank You Page?
Custom thank you pages allow you to:
- Confirm submission and provide a clear next step.
- Track conversions using tools like Google Analytics or Facebook Pixel.
- Deliver lead magnets, special offers, or next-step CTAs.
- Keep users engaged with relevant content or promotions.
Step-by-Step: Set Up a Custom Thank You Page
Step 1: Create Your Thank You Page
- In WordPress, go to Pages > Add New.
- Name it something like “Thank You” or “Submission Success”.
- Click Edit with Elementor.
- Design your page with a message like:
- “Thank you for contacting us!”
- “We’ve received your submission.”
- “Here’s your download!” (for lead magnets)
- Publish the page and copy the URL.
Step 2: Add or Edit Your Form
- Open the page where your Elementor Form widget is placed.
- Click Edit with Elementor.
- Click on the Form widget to open its settings in the left panel.
Step 3: Configure the Form’s Actions After Submit
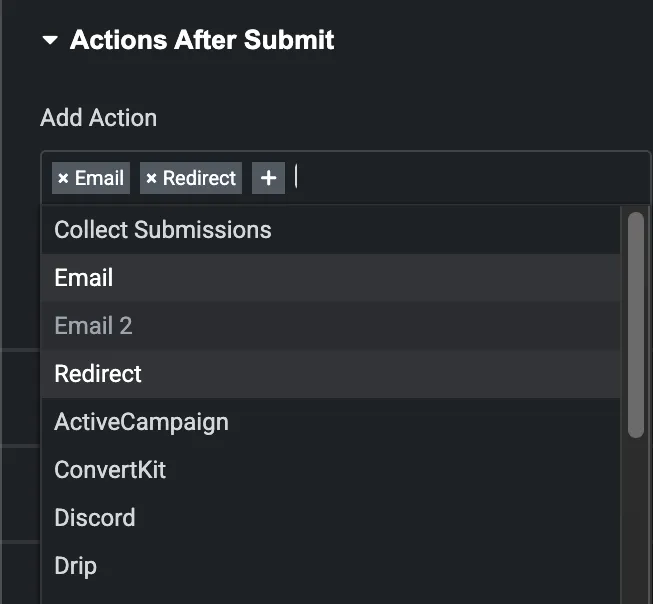
- Scroll to the Actions After Submit section.
- Click to add Redirect (along with any other actions like Email or Webhook).
- Once “Redirect” is added, a new Redirect tab will appear below.
Step 4: Set the Redirect URL
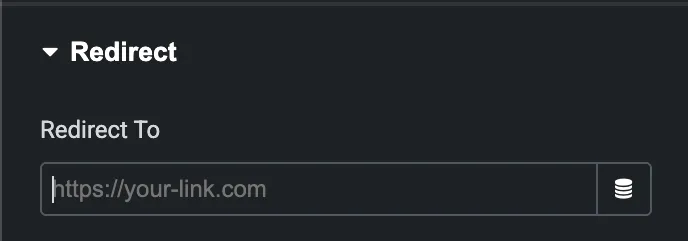
- Click the Redirect tab.
- Paste the full URL of your thank you page (e.g., https://yoursite.com/thank-you).
- Click Update to save your changes.
Step 5: Test Your Form
- Visit the live page with your form.
- Submit a test entry.
- Confirm that the form redirects to your custom thank you page.
Special Features of Thank You Pages for Elementor Pro Forms
1. Custom Confirmation Messaging
Deliver a personalized message to reassure users their submission was successful—boosting trust and user satisfaction.
2. Seamless Redirect After Submission
Automatically redirect users to any page (like a thank you or offer page) without needing extra plugins or code.
3. Conversion Tracking Ready
Perfect for marketers—add tracking codes (Google Analytics, Facebook Pixel, etc.) to monitor form performance and ROI.
4. Lead Magnet Delivery
Use thank you pages to provide instant access to downloadable content, coupons, or gated resources.
5. Funnel Optimization
Guide users to the next step—book a call, visit a product page, or sign up for something else—right after submission.
6. Fully Customizable with Elementor
Design your thank you page exactly how you want using Elementor’s drag-and-drop builder—no limits on layout, style, or content.
7. Dynamic Personalization
Combine with Dynamic Tags to show user-specific data (like names or form details) on the thank you page for a more tailored experience.
8. Spam Protection Compatible
Works perfectly with reCAPTCHA and Honeypot for secure, spam-free submissions that lead to a clean thank you page.
Pro Tips
- Add tracking codes or event triggers (e.g., Facebook Pixel, Google Analytics) on the thank you page to measure conversions.
- Use Dynamic Fields in the redirect URL if you want to personalize the thank you experience.
- Create multiple thank you pages for different forms or goals (e.g., contact, quote, download, signup).
Thank You Page Conversion Tracking Matrix
| Ad Platform | Event Action | Tracking Parameter Setup |
|---|---|---|
| Google Ads | Conversion Tag / Page Load | Fire on /thank-you/ destination URL with conversion label. |
| Google Analytics 4 | generate_lead event | Custom event triggered via Google Tag Manager on thank you page view. |
| Meta (Facebook/Instagram) | Lead Standard Event | fbq(‘track’, ‘Lead’) firing exclusively on confirmed redirect. |
Conclusion
Setting up a custom thank you page for Elementor Pro forms is a simple yet powerful way to enhance user experience and guide visitors after form submission. Whether you’re confirming a message, delivering a download, or promoting a next step, a dedicated thank you page helps you build trust and keep users engaged.
By using Elementor Pro’s built-in redirect feature, you can create a seamless post-submission journey in just a few clicks—no extra plugins required
Why Dedicated Thank You Pages Outperform In-Line Messages
Default form confirmations typically show a small generic message (“Your submission was successful”) underneath the form. While functional, this misses a massive business opportunity:
- Bulletproof Conversion Tracking: Firing conversion pixels (Google Ads, Meta Ads, LinkedIn Ads) on URL page visits (e.g.,
example.com/thank-you/) is significantly more reliable than tracking client-side button clicks or AJAX form submissions. - Lowering Customer Anxiety: Clearly communicate what happens next (e.g., “A senior strategist will review your inquiry and call you within 2 business hours”).
- Secondary Conversion Actions: Direct newly qualified leads to follow your social channels, download a PDF resource, or book a live call directly via Calendly/Google Meet.
Passing Form Data into the Thank You Page via URL Parameters
You can personalize your thank you page dynamically using URL query parameters:
- In your form’s Redirect field, append parameter tokens:
https://cvworld.in/thank-you/?lead_name=[field id="name"] - On the Thank You page, use a Heading widget with Dynamic Tag → Request Parameter (GET: lead_name).
- The visitor will see: “Thank You, [Name]! We received your request.”
Need expert conversion rate optimization, analytics tracking, or custom WordPress development? Explore our WordPress agency services at CV World.
Frequently Asked Questions
Ready to Build Professional Websites Faster?
Supercharge your WordPress design workflow with 100+ premium widgets, theme builder capabilities, and dynamic WooCommerce templates.
Install Google Tag Manager or insert your Google Ads conversion event snippet inside the header/body of the Thank You page. Every pageview represents a confirmed lead.
Yes. Set the page to noindex, nofollow in Rank Math or Yoast SEO so search engines do not index it or distort analytics metrics.
Yes. Embedding an appointment scheduler on your thank you page captures leads while their buying interest is at its absolute peak.
Yes, by using conditional logic extensions or lightweight JavaScript redirect handlers based on selected dropdown fields.
No. When implemented using modern clean-code standards, responsive Flexbox containers, and server-side caching, your website maintains rapid sub-second loading speeds and easily passes Google Core Web Vitals assessments.
Need Custom Elementor Pro Development or Speed Optimization?
Partner with CV World lead WordPress engineers for custom Theme Builder development, WooCommerce integrations, and guaranteed 90+ Core Web Vitals.