How to Use Dynamic Fields in Forms in Elementor Pro

If you’re looking to create smarter, more personalized forms on your WordPress site, Dynamic Fields in Forms in Elementor Pro are the way to go. This powerful feature lets you pull in dynamic content from your site or user data to make forms that adapt to each visitor. In this guide, we’ll walk you through how to use dynamic fields effectively in Elementor Pro forms.

What Are Dynamic Fields in Elementor Pro Forms?

Dynamic fields allow you to insert dynamic data—like a logged-in user’s name, a custom post title, or even URL parameters—into form fields. Instead of static, one-size-fits-all input boxes, you can pre-fill or modify fields based on the context, saving time and enhancing user experience.

Why Use Dynamic Fields in Forms in Elementor Pro?

Here’s why dynamic fields are a game changer:

  • Personalized user experience: Pre-fill name, email, or other details for logged-in users.
  • Faster form completion: Reduce friction by filling out known data automatically.
  • Improved lead tracking: Pass data from URL parameters or custom fields.
  • Smart automation: Trigger actions based on post type, author, or taxonomy.

How to Use Dynamic Fields in Forms in Elementor Pro

Follow these steps to start using dynamic fields in your forms:

Step 1: Add a Form Widget

Drag and drop the Form widget from Elementor Pro into your page. You can choose any layout or design that fits your needs.

Step 2: Add or Edit a Form Field

Choose a form field (like “Text,” “Email,” or “Hidden”) where you want to use dynamic content.

Step 3: Enable Dynamic Tags

Dynamic Fields in Forms in Elementor Pro

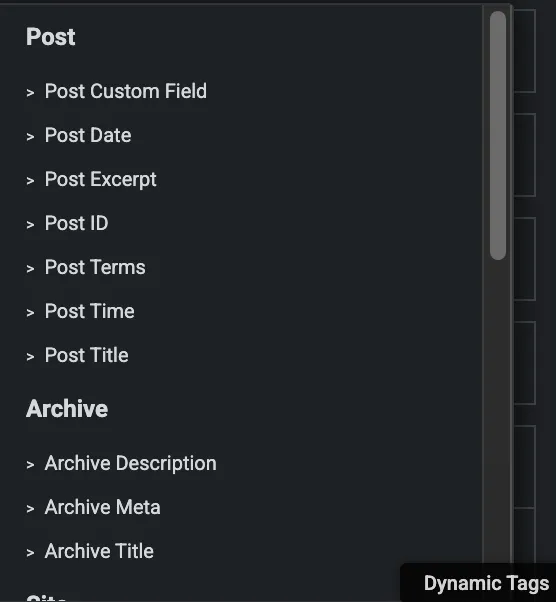
Next to the Default Value field (or Placeholder, depending on the field type), you’ll see a database icon. Click on it to access Elementor’s Dynamic Tags options.

Step 4: Choose Your Dynamic Field Source

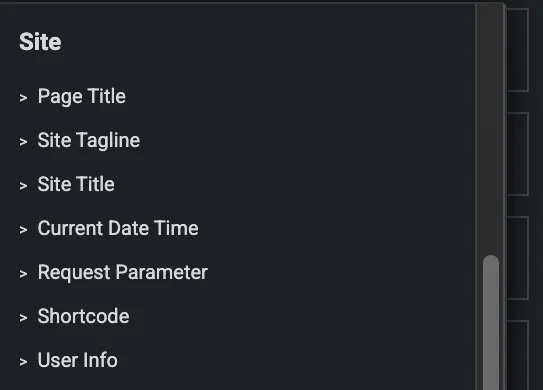
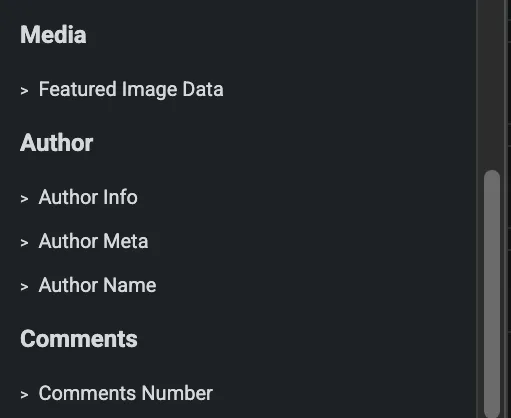
Here are a few common dynamic tags you might use:
Dynamic-Tag-Options-1
Dynamic-Tages-optons-2
Dynamic-Tags-option-3
  • Post Title – Automatically fill the title of the current post or page.
  • Author Name – Insert the post or page author’s name.
  • User Info – Pull in logged-in user data like name, email, or ID.
  • URL Parameter – Use data passed in the URL (e.g., ?campaign=summer-sale).
  • ACF Field – If you use Advanced Custom Fields, pull in those values.

Step 5: Customize with Fallback Text

Each dynamic field allows you to set fallback text in case the dynamic data isn’t available. This ensures your form still works smoothly even if something’s missing.

Step 6: Use Hidden Fields for Lead Tracking

You can add a Hidden form field and use a dynamic tag (like a referral ID from a URL parameter) to pass behind-the-scenes data into your CRM or email marketing tool.

Step 7: Save and Test

Preview your page and test your form by viewing it as a logged-in user, or try accessing the page with different URL parameters. Make sure all fields populate correctly.

Pro Tips for Using Dynamic Fields in Elementor Pro Forms

  • Combine dynamic fields with conditional logic for even more personalized forms.
  • Use webhooks to send dynamic field data to third-party tools like Zapier, Mailchimp, or HubSpot.
  • Keep fallback values friendly and informative to prevent confusion.

Special Features of Using Dynamic Fields in Forms in Elementor Pro

1. Personalized User Experience

Pre-fill form fields (like name or email) for logged-in users, creating a seamless and customized interaction.

2. Dynamic Data Integration

Pull real-time data from posts, pages, custom fields (like ACF), or user profiles directly into form fields—no coding needed.

3. URL Parameter Support

Automatically populate form fields using query strings (e.g., ?ref=affiliate123), great for marketing and lead tracking campaigns.

4. Advanced Lead Tracking

Use hidden fields with dynamic tags to collect background data like post IDs, campaign names, or referral info—perfect for CRMs and analytics.

5. Flexible Field Options

Apply dynamic values to a variety of fields—text, hidden, email, textarea, and more—giving you full control over the data flow.

6. Logged-In User Data Integration

Use the User Info dynamic tag to pull data from the current logged-in user’s profile, like username, email, or user ID.

7. Custom Field Support (ACF, Pods, JetEngine, etc.)

Easily insert custom meta field data into your forms using integrations with tools like Advanced Custom Fields (ACF).

Conclusion

Using Dynamic Fields in Forms in Elementor Pro is a powerful way to personalize the user experience, streamline form submissions, and capture more meaningful data. Whether you’re pre-filling user information, pulling in post content, or using URL parameters, dynamic fields help you build smarter, more responsive forms without extra plugins or code.

By mastering this feature, you’ll not only save time but also boost engagement and conversion rates. Start experimenting with dynamic tags in your forms today, and watch your forms go from static to smart.

How to Create a Custom WooCommerce Product Page in Elementor Pro

If you’re running a WooCommerce store and want your product pages to stand out, you’ve probably asked yourself: “How to Create WooCommerce Page in Elementor Pro?” Good news—you don’t need to be a developer or use complex code to make stunning product layouts. With Elementor Pro, you can design fully customized product pages that match your brand and improve your customer’s shopping experience.

In this step-by-step guide, we’ll show you exactly how to create a custom WooCommerce product page using Elementor Pro.


Why Customize Your WooCommerce Product Page?

Default WooCommerce product pages can feel generic and don’t always align with your brand’s identity or user experience goals. By learning how to create a custom WooCommerce product page in Elementor Pro, you can:

  • Improve your store’s visual appeal
  • Highlight product features more effectively
  • Increase conversion rates with strategic design elements
  • Ensure consistency with the rest of your website
Get Elementor Pro Just
₹499/ Year
Our Other Plugins

How to Create WooCommerce Page in Elementor Pro-Step By Step Guide

Follow these simple steps to build your own product page design from scratch.

Step 1: Make Sure You Have the Right Tools

Before you begin, make sure the following are installed and activated:

  • Elementor Pro
  • WooCommerce
  • A WordPress theme that works well with Elementor (like Hello or Astra)

Step 2: Open Elementor Theme Builder

Templates
Theme-Builder-Options
New-Single-Product-Page
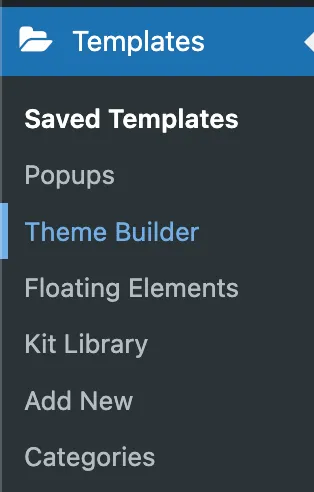
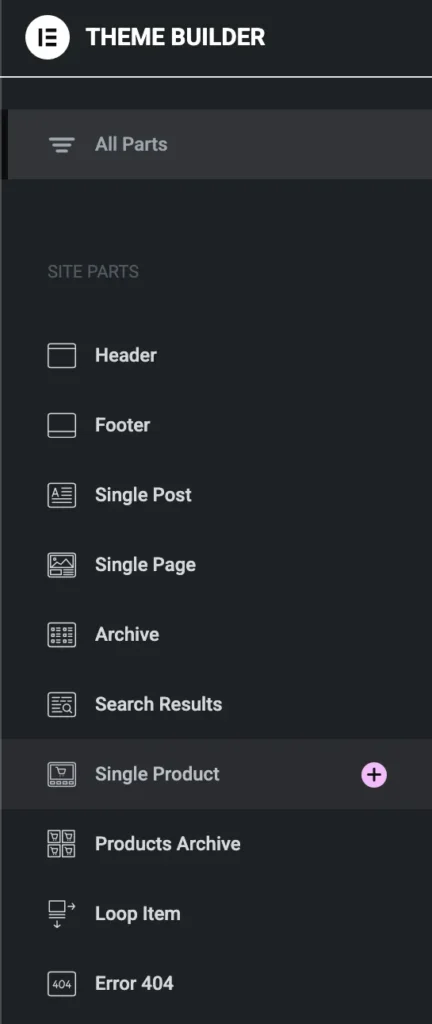
  1. From your WordPress dashboard, go to:
    • Templates → Theme Builder.
  1. Click the “Single Product” tab.
  2. Click “Add New”, choose Single Product, and name your template.

Step 3: Choose a Template or Start From Scratch

You’ll be prompted to select from Elementor’s pre-designed WooCommerce product templates. You can:

  • Import one to customize it, or
  • Start from a blank canvas for full design control.

Step 4: Add WooCommerce Product Widgets

Elementor Pro includes special widgets designed for WooCommerce. To build your layout, drag in widgets such as:

How to Create WooCommerce Page in Elementor Pro
  • Product Title
  • Product Image / Gallery
  • Product Price
  • Add to Cart Button
  • Product Rating
  • Product Description
  • Product Stock
  • Product Meta (SKU, categories, etc.)
  • Product Tabs (for reviews, additional info)

 Tip: Use sections and columns to create a layout that feels clean and user-friendly.


Step 5: Customize the Design

Use Elementor’s powerful styling options to match your brand:

  • Adjust fonts, colors, spacing, and backgrounds
  • Add icons, badges, trust signals, or product benefits
  • Make the page mobile responsive using the responsive editing mode

You can also use dynamic content so that your design automatically populates product-specific details.


Step 6: Set Display Conditions

After designing your custom WooCommerce product page:

  1. Click Publish.
  2. Set the Display Conditions — for example:
    • Apply to All Products
    • Or only to specific categories or product types
  3. Click Save & Close.

Now, all selected products will use your new custom layout!


Bonus Tips for Better Product Pages

  • Add upsell or related products below the main product.
  • Include trust-building elements like reviews, badges, and guarantees.
  • Use sticky add to cart buttons for easier purchasing on mobile.
  • Add product videos or interactive galleries to increase engagement.
Get Elementor Pro Just
₹499/ Year
Our Other Plugins

Conclusion

Knowing how to create a custom WooCommerce product page in Elementor Pro gives you a serious edge as an online store owner. Instead of relying on default WooCommerce layouts, you can create beautifully branded pages that better showcase your products, increase conversions, and provide a superior shopping experience.

Whether you’re selling digital downloads, physical products, or custom services, Elementor Pro makes it easy to build product pages that not only look great—but also perform.

How to Design a Custom Archive Page in Elementor Pro

How to Design Archive Page in Elementor Pro is a question many WordPress users ask when they want more control over how their blog posts, categories, or custom post types are displayed. By default, WordPress applies a standard layout to archive pages, which often lacks the customization and branding needed for a professional-looking site. With Elementor Pro, you can break free from these limitations and create archive pages that are visually compelling, user-friendly, and fully aligned with your site’s design.

In this guide, we’ll walk you through everything you need to know about how to design a custom archive page in Elementor Pro—from setting up your template and choosing the right widgets, to applying dynamic content and fine-tuning layout settings. Whether you’re building a blog, portfolio, or online shop, this tutorial will help you deliver a polished and personalized browsing experience to your visitors.

 Understanding WordPress Archive Pages

In WordPress, archive pages display groups of content based on specific criteria, such as:​

  • Categories: Posts grouped under a particular category.
  • Tags: Posts associated with specific tags.
  • Date Archives: Posts published within a specific time frame.
  • Author Archives: Posts authored by a particular user.
  • Search Results: Posts that match a user’s search query.
  • Custom Post Types: Content types like portfolios, testimonials, or events.​

By default, WordPress applies a standard template to these archive pages. However, Elementor Pro allows you to override this default and design custom archive templates that provide a unique user experience.​


Steps to Create a Custom Archive Page

1. Set Up the Archive Page in WordPress

Before diving into Elementor:

New-Page
Page-Title
  • Navigate to Pages > Add New in your WordPress dashboard.
  • Title the page (e.g., “Blog”).
  • Publish the page.​

Then, assign this page as your posts page:​

  • Go to Settings > Reading.
  • Under Your homepage displays, select A static page.
  • For Posts page, choose the blank page you just created.
  • Save Changes

2. Create a New Archive Template in Elementor Pro

With Elementor Pro, you can design a custom archive template:​

Templates
Theme-Builder-Option
Archive-new-Page
  • Navigate to Templates > Theme Builder.
  • Click on Add New, select Archive, and name your template (e.g., “Custom Blog Archive”).
  • Click Create Template.​

Elementor will open the editor, allowing you to design your archive page. You can choose to start from scratch or insert a pre-designed block.​


3. Design the Archive Layout

Utilize Elementor’s widgets to craft your desired layout:​

How-to-Design-Archive-Page-in-Elementor-Pro
  • Archive Posts Widget: Displays a list of posts from the current archive.
  • Archive Title Widget: Shows the title of the current archive (e.g., “Category: News”).
  • Archive Description Widget: Provides a description of the current archive.
  • Pagination Widget: Allows users to navigate through multiple pages of posts.​

Customize each widget’s settings to match your design preferences. For instance, adjust the number of columns in the Archive Posts widget, or style the typography and colors to align with your brand.​


4. Set Display Conditions

After designing your archive template, it’s crucial to set display conditions to determine where the template appears:​

  • Click Publish.
  • In the Display Conditions window, click Add Condition.
  • Choose where you want the template to be applied (e.g., All Archives, Specific Categories, Custom Post Types).
  • Click Save & Close.​

This ensures your custom archive template is applied to the appropriate pages on your site.​


5. Enhance with Dynamic Content

To make your archive pages more engaging, consider adding dynamic content:​

  • Custom Fields: Use plugins like Advanced Custom Fields (ACF) to add custom fields to your taxonomies.
  • Dynamic Tags: Incorporate dynamic tags to display custom field values, such as unique images or descriptions for each category.
  • Listing Grid: Utilize the Listing Grid widget to showcase items like portfolio projects or products in a grid layout.​

By integrating dynamic content, you can create personalized and interactive archive pages that resonate with your audience.​


Best Practices for Custom Archive Pages

  • Consistent Branding: Ensure your archive pages align with your site’s overall branding, including colors, typography, and imagery.
  • User Experience: Design intuitive navigation with clear categories, filters, and pagination to enhance user experience.
  • Mobile Responsiveness: Optimize your archive pages for mobile devices to ensure accessibility across all platforms.
  • SEO Optimization: Use SEO-friendly practices, such as descriptive titles and meta descriptions, to improve search engine rankings.​

Conclusion

Designing a custom archive page in Elementor Pro not only enhances the visual appeal of your website but also improves user experience by presenting content in a structured, intuitive, and engaging way. With the powerful features of Elementor’s Theme Builder, you can easily create archive templates tailored to specific categories, tags, post types, or author archives — all without writing a single line of code.

From setting up your template and choosing the right widgets, to applying dynamic content and customizing design elements, Elementor Pro gives you full creative control. Whether you’re running a blog, an online store, or a portfolio, custom archive pages ensure that visitors can easily explore and discover your content.

By following the steps outlined in this guide and applying best practices for responsive design and SEO, you’ll be able to build archive pages that not only look great but function seamlessly across all devices. The result? A more professional, user-friendly site that keeps visitors engaged and encourages deeper content exploration.

Ready to elevate your website’s structure and style? Dive into Elementor Pro and start creating archive pages that reflect your brand and content strategy — beautifully and efficiently.

How to Use Elementor Pro Global Widgets Feature

If you’re designing websites with Elementor Pro, mastering the Elementor Pro Global Widget can save you hours of work and create design consistency across your entire site. Whether you’re a web designer, developer, or just a WordPress enthusiast, this powerful feature helps you manage and reuse design elements effortlessly.


What is the Elementor Pro Global Widgets?

The Global Widget Feature in Elementor Pro allows you to create a widget once and reuse it on multiple pages of your site. Instead of editing the same element over and over again in different places, you can update the global widget once—and every instance will update automatically.

Think of it as a “master widget” that controls all the linked versions across your site. This is particularly useful for elements like:

  • Call-to-action buttons
  • Testimonial boxes
  • Contact forms
  • Pricing tables
  • Footers or banners

Why Use the Elementor Pro Global Widget?

Using the Global Widget Feature in Elementor Pro provides many benefits:

1. Consistency Across Pages

Maintain a consistent design by reusing the same widget everywhere—your site looks polished and professional.

2. Time-Saving Workflow

Update once, apply everywhere. No need to edit every page individually if changes are required.

3. Easy Management

Centralized control of design components saves time and reduces human error during updates.

4. Efficient Collaboration

If you’re part of a design team, global widgets make it easier to maintain brand guidelines and update client sites quickly.

Get Elementor Pro Just
₹499/ Year
Our Other Plugins

How to Create a Global Widget in Elementor Pro

Here’s a step-by-step guide on how to use the Global Widget Feature:

Step 1: Open a Page with Elementor

  • Go to your WordPress dashboard.
  • Choose the page or template you want to edit and open it with Elementor.

Step 2: Add and Customize a Widget

  • Drag and drop any widget (e.g., a button or text block).
  • Style it according to your needs.

Step 3: Save as a Global Widget

Elementor-Pro-Global-Widget
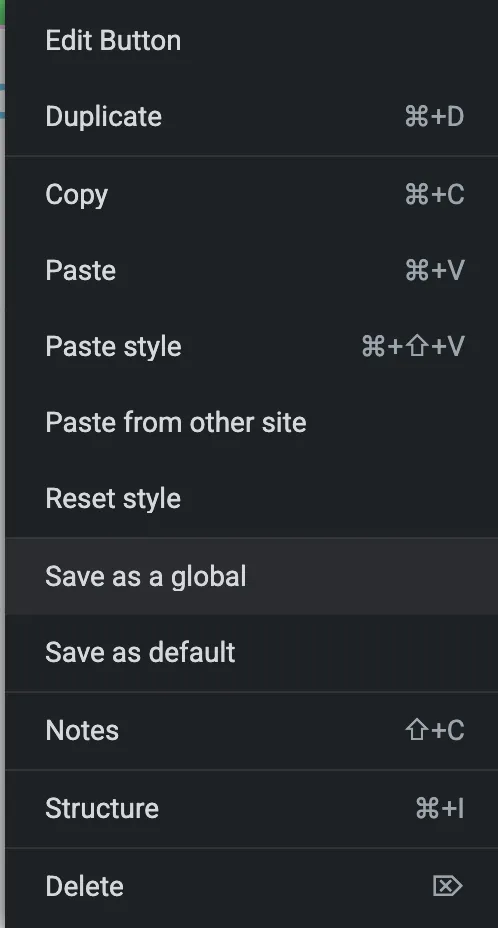
  • Right-click on the widget.
  • Select “Save as a Global”.
  • Name your global widget (e.g., “CTA Button”).

Step 4: Reuse the Global Widget

Globals-Widgets
  • Go to another page.
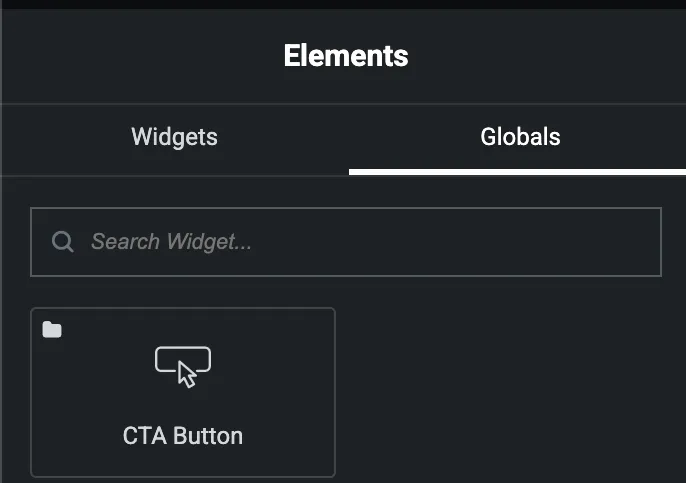
  • In the Elementor panel, click the “Global” tab.
  • Drag your saved global widget into place.

Step 5: Edit the Global Widget

  • Right-click the global widget and choose “Edit Global”.
  • Make your changes and hit Update.
  • All instances across the site will be updated automatically.

Tips for Managing Global Widgets

  • Rename Wisely: Use clear names so you can identify widgets easily later.
  • Avoid Overuse: Use the Global Widget Feature for elements that truly require global consistency.
  • Test Before Saving: Double-check your design before making a widget global to avoid unintended updates.
  • Use Templates for Complex Sections: If a widget includes multiple elements, consider saving the section as a template instead.
Get Elementor Pro Just
₹499/ Year
Our Other Plugins

Conclusion: Take Control with Elementor Pro Global Widget

The Elementor Pro Global Widget is a powerful tool that simplifies website management, boosts design consistency, and significantly saves time. Whether you’re updating call-to-action buttons, testimonials, or contact forms, using global widgets ensures every change reflects across your site with just one edit.

By mastering the Global Widget Feature, you’re not only working smarter but also maintaining a professional and unified look throughout your WordPress site. It’s an essential feature for anyone serious about efficient and scalable web design with Elementor Pro.

How to Add Lottie Animations in Elementor Pro

Introduction

In today’s fast-paced digital world, engaging web design is more important than ever—and that’s where Lottie Animations in Elementor Pro come in. These lightweight, high-quality animations can bring your website to life without slowing it down. Whether you’re creating interactive icons, animated illustrations, or scroll-triggered effects, Lottie Animations in Elementor Pro offer a powerful way to enhance user experience. In this guide, you’ll learn how to master the process of adding and customizing Lottie animations in just a few easy steps using Elementor Pro’s built-in tools.

What Are Lottie Animations?

Lottie animations are JSON-based animations exported from Adobe After Effects using the Bodymovin plugin. They are lightweight and scalable without loss of quality, making them perfect for modern web design. These animations can be used for icons, loading screens, illustrations, and more.

Why Use Lottie Animations in Elementor?

Using Lottie animations in Elementor can significantly enhance user engagement, make your website look more dynamic, and improve visual storytelling. Elementor Pro includes a native Lottie widget, so there’s no need for third-party plugins.

Get Elementor Pro Just
₹499/ Year
Our Other Plugins

Step-by-Step Guide: Adding Lottie Animations in Elementor Pro

Step 1: Prepare Your Lottie Animation File

  1. Go to LottieFiles.com.
  2. Browse and download a Lottie animation in .json format or copy the Lottie file URL.
  3. If you’re creating your own, export it from After Effects using the Bodymovin plugin.

Step 2: Open Elementor Editor

  1. Open the page or post where you want to add the animation.
  2. Click Edit with Elementor.

Step 3: Add the Lottie Widget

Lottie Animations in Elementor Pro
  1. In the Elementor editor, search for “Lottie” in the widgets panel.
  2. Drag and drop the Lottie widget onto your desired section or column.

Step 4: Configure the Animation Settings

Lottie-Animation-Setting
Lottie Animations in Elementor Pro
  • Source: Choose whether to upload the .json file or paste a URL from LottieFiles.
  • Trigger: Set how the animation should play:
    • On Load
    • On Scroll
    • On Click
    • On Hover
  • Loop and Autoplay: Toggle these based on your design needs.

Step 5: Customize Style and Placement

Step 6: Preview and Publish

  1. Preview the animation in responsive views.
  2. Make sure it’s optimized across devices.
  3. Click Publish or Update to make it live.
Get Elementor Pro Just
₹499/ Year
Our Other Plugins

Key Features of Adding Lottie Animations in Elementor Pro

  1. Built-In Lottie Widget
    Elementor Pro includes a native Lottie widget, allowing you to add animations without needing extra plugins or custom code.
  2. Supports JSON Files and URLs
    Easily upload .json animation files or insert a direct URL from LottieFiles to embed animations.
  3. Multiple Trigger Options
    Choose how your animation plays—on load, hover, click, or scroll—for fully interactive web experiences.
  4. Customizable Playback Controls
    Adjust animation speed, loop settings, direction (normal or reverse), and playback start/end points directly in the widget panel.
  5. Responsive Design Control
    Scale and position your animations seamlessly across desktop, tablet, and mobile views

Tips for Using Lottie Animations in Elementor

  • Keep it subtle: Avoid overusing animations to maintain a clean user experience.
  • Optimize file size: Use compressed Lottie files for faster loading.
  • Test on mobile: Ensure animations don’t break on smaller screens.

Final Thoughts

Integrating Lottie animations in Elementor is one of the easiest ways to elevate your web design. With just a few steps, you can add interactive, smooth, and professional-looking animations that enhance your site’s UX without compromising performance. Elementor Pro’s built-in Lottie widget makes this process seamless and code-free.

Conclusion

Adding Lottie animations in Elementor is a simple yet powerful way to enhance your website’s visual appeal and user experience. With Elementor Pro’s built-in Lottie widget, you can easily integrate high-quality, lightweight animations without writing a single line of code. Whether you’re aiming to draw attention to a call-to-action, illustrate a concept, or simply add flair to your design, Lottie animations offer a professional and modern touch. Start using them today to make your web pages more engaging and interactive.


How to Set Up Custom Thank You Pages for Elementor Pro Forms

If you’re using Elementor Pro to build high-converting forms, knowing how to set up thank you pages for Elementor Pro forms is a must. A custom thank you page not only confirms the successful form submission but also offers a great opportunity to engage users further—whether it’s delivering a special offer, providing a download, or guiding them to the next step.In this tutorial, we’ll walk you through exactly how to set up custom thank you pages for Elementor Pro forms, step-by-step. You’ll learn how to redirect users after submission, why thank you pages matter, and how to fully customize the experience to match your brand and goals.

Why Use a Custom Thank You Page?

Custom thank you pages allow you to:

  • Confirm submission and provide a clear next step.
  • Track conversions using tools like Google Analytics or Facebook Pixel.
  • Deliver lead magnets, special offers, or next-step CTAs.
  • Keep users engaged with relevant content or promotions.

Step-by-Step: Set Up a Custom Thank You Page

Step 1: Create Your Thank You Page

  1. In WordPress, go to Pages > Add New.
  2. Name it something like “Thank You” or “Submission Success”.
  3. Click Edit with Elementor.
  4. Design your page with a message like:
    • “Thank you for contacting us!”
    • “We’ve received your submission.”
    • “Here’s your download!” (for lead magnets)
  5. Publish the page and copy the URL.

Step 2: Add or Edit Your Form

  1. Open the page where your Elementor Form widget is placed.
  2. Click Edit with Elementor.
  3. Click on the Form widget to open its settings in the left panel.
Get Elementor Pro Just
₹499/ Year
Our Other Plugins

Step 3: Configure the Form’s Actions After Submit

How to Set Up Thank You Pages for Elementor Pro Forms
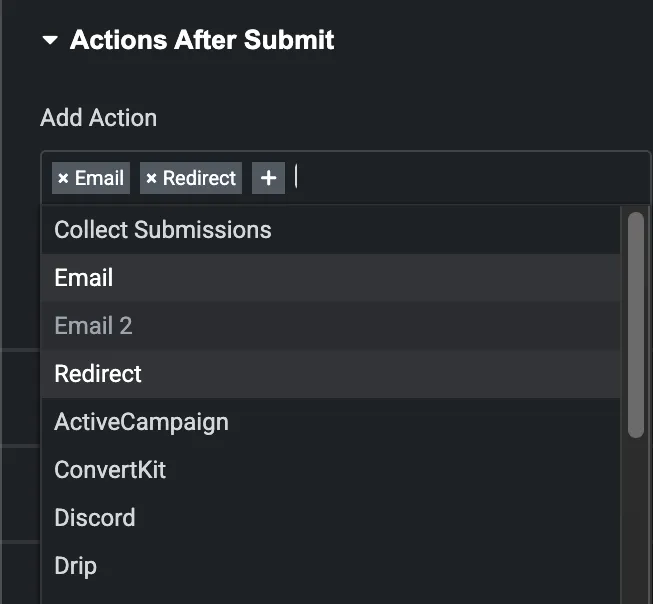
  1. Scroll to the Actions After Submit section.
  2. Click to add Redirect (along with any other actions like Email or Webhook).
  3. Once “Redirect” is added, a new Redirect tab will appear below.

Step 4: Set the Redirect URL

Redirect-Field
  1. Click the Redirect tab.
  2. Paste the full URL of your thank you page (e.g., https://yoursite.com/thank-you).
  3. Click Update to save your changes.

Step 5: Test Your Form

  • Visit the live page with your form.
  • Submit a test entry.
  • Confirm that the form redirects to your custom thank you page.

Special Features of Thank You Pages for Elementor Pro Forms

1. Custom Confirmation Messaging

Deliver a personalized message to reassure users their submission was successful—boosting trust and user satisfaction.

2. Seamless Redirect After Submission

Automatically redirect users to any page (like a thank you or offer page) without needing extra plugins or code.

3. Conversion Tracking Ready

Perfect for marketers—add tracking codes (Google Analytics, Facebook Pixel, etc.) to monitor form performance and ROI.

4. Lead Magnet Delivery

Use thank you pages to provide instant access to downloadable content, coupons, or gated resources.

5. Funnel Optimization

Guide users to the next step—book a call, visit a product page, or sign up for something else—right after submission.

6. Fully Customizable with Elementor

Design your thank you page exactly how you want using Elementor’s drag-and-drop builder—no limits on layout, style, or content.

7. Dynamic Personalization

Combine with Dynamic Tags to show user-specific data (like names or form details) on the thank you page for a more tailored experience.

8. Spam Protection Compatible

Works perfectly with reCAPTCHA and Honeypot for secure, spam-free submissions that lead to a clean thank you page.

Pro Tips

  • Add tracking codes or event triggers (e.g., Facebook Pixel, Google Analytics) on the thank you page to measure conversions.
  • Use Dynamic Fields in the redirect URL if you want to personalize the thank you experience.
  • Create multiple thank you pages for different forms or goals (e.g., contact, quote, download, signup).
Get Elementor Pro Just
₹499/ Year
Our Other Plugins

Conclusion

Setting up a custom thank you page for Elementor Pro forms is a simple yet powerful way to enhance user experience and guide visitors after form submission. Whether you’re confirming a message, delivering a download, or promoting a next step, a dedicated thank you page helps you build trust and keep users engaged.

By using Elementor Pro’s built-in redirect feature, you can create a seamless post-submission journey in just a few clicks—no extra plugins required

Master How to Create a Single Post in Elementor Pro

Designing a custom blog post layout can take your website from basic to beautifully branded. If you’re using Elementor Pro, one of the most powerful tools at your fingertips is the ability to design a Single Post in Elementor Pro. This feature lets you build a custom template that automatically applies to all your blog posts—saving you time while keeping your site consistent and visually appealing.

In this article, we’ll walk you through how to create a Single Post in Elementor, even if you’re not a design expert.


 What is a Single Post in Elementor Pro?

A Single Post template controls the design of individual blog posts on your WordPress site. With Elementor Pro, you can create one dynamic layout and apply it to all your blog posts automatically. This gives you full control over the appearance of:

  • Post titles
  • Featured images
  • Content
  • Metadata (like date, author, and category)
  • Comments and navigation
  • Related posts and more
Get Elementor Pro Just
₹499/ Year
Our Other Plugins

How to Create a Single Post in Elementor Pro (Step-by-Step)

1. Open Elementor Theme Builder

Single Post in Elementor Pro
Theme-Builder-Options

Start by accessing Elementor’s Theme Builder:

  • Go to your WordPress Dashboard.
  • Navigate to Templates → Theme Builder.
  • Select the “Single” tab and click “Add New”.
Single-post
  • Choose Single Post as the type of template, then click Create Template.

2. Choose a Pre-Made Template (Optional)

Elementor provides several beautiful pre-designed Single Post in Elementor templates. You can import one and customize it—or start from scratch by closing the template library.

3. Add Core Elements to Your Layout

Use Elementor widgets to build out your blog post layout. Here are the essentials:
Single-Post-Options
  • Post Title – Displays your blog post title dynamically.
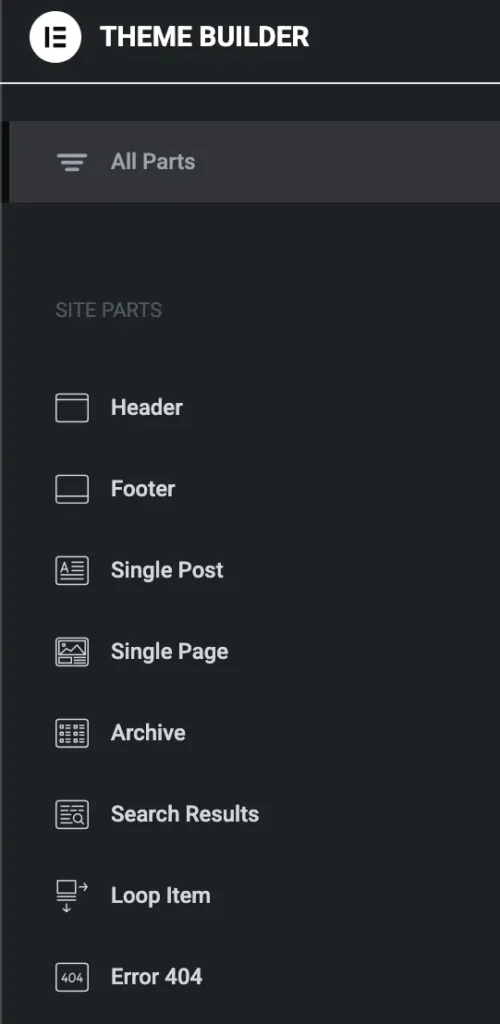
  • Post Content – Pulls in the actual content of each post.
  • Featured Image – Automatically shows the featured image of each post.
  • Post Info – Adds author, date, category, and more.
  • Post Navigation – Allows users to move between posts.
  • Author Box and Comments – Boost engagement with built-in interactivity.

4. Insert Dynamic Tags

Use Elementor’s dynamic tags to ensure each blog post pulls in the correct information. For example:

  • Add the Post Title using the Dynamic Field.
  • Insert the Featured Image using the Featured Image widget.
  • Display the author name, publish date, and categories with the Post Info widget.

5. Style Your Layout

Customize fonts, spacing, colors, and layouts to match your brand. Make sure your Single Post in Elementor design looks great on desktop, tablet, and mobile.

6. Set Display Conditions

When you’re done designing:

  • Click Publish.
  • Set the Display Conditions to apply this template to All Posts or specific categories or tags.
  • Click Save & Close.

Now, every new blog post will automatically use this template.


 Why Use Elementor for Your Single Post Layout?

Using Elementor Pro to create your Single Post in Elementor gives you:

  • Design Freedom – No more relying on default WordPress layouts.
  • Dynamic Content – Content updates automatically for each post.
  • Mobile Responsiveness – Easily design layouts for all screen sizes.
  • Time Efficiency – Design once, apply everywhere.

Pro Tips

  • Add a “Related Posts” widget at the bottom of your post to increase engagement.
  • Use Advanced Custom Fields (ACF) for even more dynamic content.
  • Make use of global fonts and colors to keep your design consistent across your site.
Get Elementor Pro Just
₹499/ Year
Our Other Plugins

Conclusion

Creating a Single Post in Elementor Pro is one of the most powerful ways to customize your WordPress blog without touching a line of code. With Elementor Pro’s intuitive drag-and-drop builder, you can design a beautiful, consistent layout that automatically applies to all your blog posts—saving you time and ensuring your content always looks its best.

Whether you’re running a personal blog, a news site, or a content-heavy platform, using a custom single post template allows you to elevate your design, improve user experience, and showcase your brand more professionally.

Ready to take your blog to the next level? Start designing your Single Post in Elementor Pro today and turn every post into a polished, branded experience.

How to Create Scroll-Based Animations in Elementor Pro

Introduction

Scrolling Animations in Elementor Pro open up a powerful way to bring your website to life. These animations allow elements to move, fade, rotate, zoom, or change as the user scrolls through the page — creating a dynamic, interactive browsing experience that captures attention and keeps visitors engaged.

With just a few clicks, Elementor Pro users can apply advanced Motion Effects that respond to scroll direction and position, all without needing any custom code. Whether you’re building a creative portfolio, a modern business site, or a visually engaging landing page, scroll-based animations help elevate your design and storytelling.

In this guide, we’ll explore how to use Scrolling animations in Elementor, the types of effects available, and how to implement them effectively for maximum visual impact — all using the intuitive Elementor Pro interface.

What is Motion Effect?

Motion Effects in Elementor Pro are advanced animation features that allow you to add movement and interactivity to your website elements — all without writing code.

They include both scroll-based animations and mouse interaction effects, giving your design a dynamic and engaging feel.

Why Use Scroll-Based Animations in Elementor Pro?

  • Boost user engagement
  • Create smooth storytelling flows
  • Highlight key content
  • Improve visual appeal
  • No coding required

 How to Create Scrolling Animations in Elementor Pro

Step 1: Open Elementor Editor

  • Go to the page or template you want to edit.
  • Click Edit with Elementor.

Step 2: Select the Widget or Section

  • Click on the widget, column, or section that you want to animate on scroll.

Step 3: Go to Advanced > Motion Effects

  • In the Elementor panel on the left:
    • Click on the Advanced tab.
    • Scroll down to Motion Effects.

Step 4: Enable Scrolling Effects

Toggle on Scrolling Effects.

Scrolling Animations in Elementor pro

You’ll see several scroll animation options under this setting.


Step 5: Choose Your Animation Type

You can apply multiple scrolling effects like:

Motion-Effact-Options
Animation TypeDescription
Vertical ScrollMoves the element up or down based on scroll position.
Horizontal ScrollMoves the element left or right.
TransparencyFades the element in or out while scrolling.
BlurAdds a blur effect during scroll.
RotateRotates the element as the user scrolls.
ScaleZooms in or out on scroll.

Choose one or combine several depending on the effect you’re going for.

Get Elementor Pro Just
₹499/ Year
Our Other Plugins

Step 6: Customize Scroll Settings

Each scroll effect lets you fine-tune:

Scroll-Effa
ects
  • Direction (Up/Down, Left/Right)
  • Speed
  • Viewport settings (Start and End values to control when effect triggers)

Example: For a fade-in effect:

  • Choose Transparency
  • Set Fade In direction
  • Adjust Viewport values to control when the fade starts and ends

Step 7: Preview & Adjust

  • Use the Preview button to test the animation.
  • Make tweaks until it looks just right on scroll.

Bonus Tips for Scroll-Based Animations in Elementor:

  • Combine with Entrance Animations for extra effect when the element appears.
  • Make sure animations don’t interfere with accessibility and readability.
  • Keep performance in mind – avoid overusing animations.

Special Features of Scroll-Based Animations in Elementor Pro

1. Visual Scroll-Based Triggers

2. Multiple Animation Types

3. Independent & Combined Effects

4. No Coding Required

5. Custom Speed & Direction

6. Responsive Control

7. Performance Optimized

9. Integrates Seamlessly with Other Elementor Features

Get Elementor Pro Just
₹499/ Year
Our Other Plugins

Conclusion

Scrolling Animations in Elementor pro offer a powerful way to create visually engaging, interactive websites that capture user attention and enhance the browsing experience. With Elementor Pro’s intuitive Motion Effects panel, you can animate elements based on scroll direction, speed, and viewport — all without touching a single line of code. Whether you’re designing a creative portfolio, a dynamic landing page, or a storytelling layout, scrolling animations help bring your content to life. By using these effects strategically, you can elevate both the look and functionality of your website, making it more immersive and memorable for visitors.

How to Create a Custom Search Results Page with Elementor Pro

If you’re looking to improve your website’s search functionality and user experience, it’s time to How to Create Search Results Page in Elementor Pro. The default WordPress search page often looks plain and lacks flexibility, but with Elementor Pro’s powerful tools, you can fully customize how search results are displayed to better match your site’s branding and layout.
By using the Theme Builder in Elementor Pro, you can design a search results page that’s not only visually appealing but also optimized for usability. Whether you want to display posts, products, or custom post types, you’ll have full control over how your content is presented.
In this guide, we’ll walk you through everything you need to know to create a custom search results page with Elementor Pro, step by step—no coding skills required.nner.​

 Prerequisites

  • Elementor Pro: Ensure you have Elementor Pro installed and activated.
  • Compatible Theme: Verify that your theme supports Elementor’s Theme Builder.​
Get Elementor Pro Just
₹499/ Year
Our Other Plugins

How to Create Search Results Page in Elementor Pro Step-by-Step Guide

1. Access Elementor’s Theme Builder

Templates
How to Create Search Results Pages with Elementor Pro
new-page
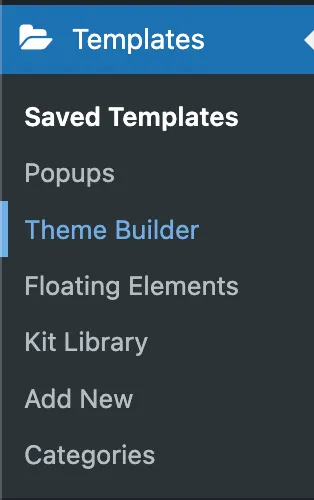
  • Navigate to your WordPress dashboard.
  • Go to TemplatesTheme Builder.
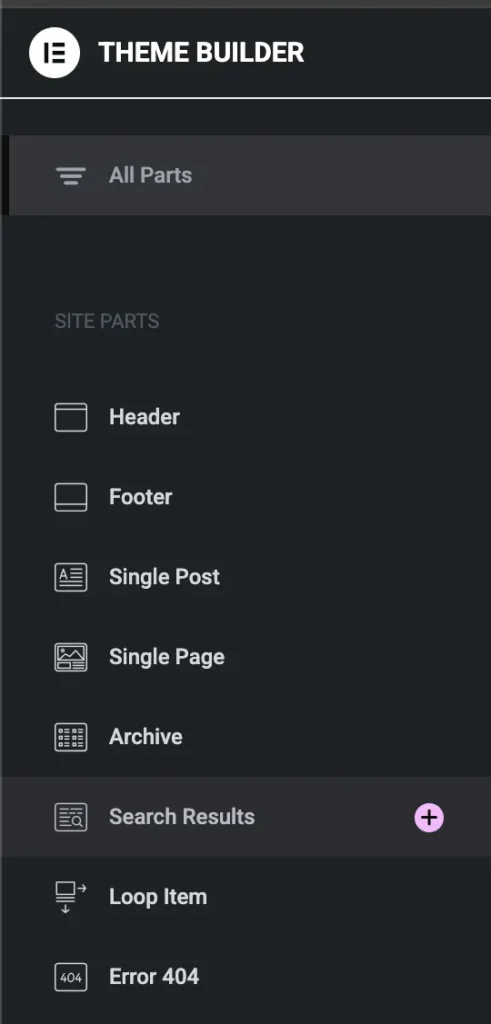
  • Click on Add New and select Search Results as the template type.
  • Choose to create the template from scratch or select a pre-designed template from the library.​

2. Design the Search Results Page

Search-Result
  • Header Section: Add a heading widget to display a title like “Search Results for: [Search Term]”.
  • Search Form: Include a search form widget to allow users to initiate new searches.
  • Results Display: Use the Archive Posts widget to display the search results. Configure the layout, number of columns, and other settings as desired.
  • Empty State Message: Design a message to display when no results are found, informing users accordingly.​

3. Configure Display Conditions

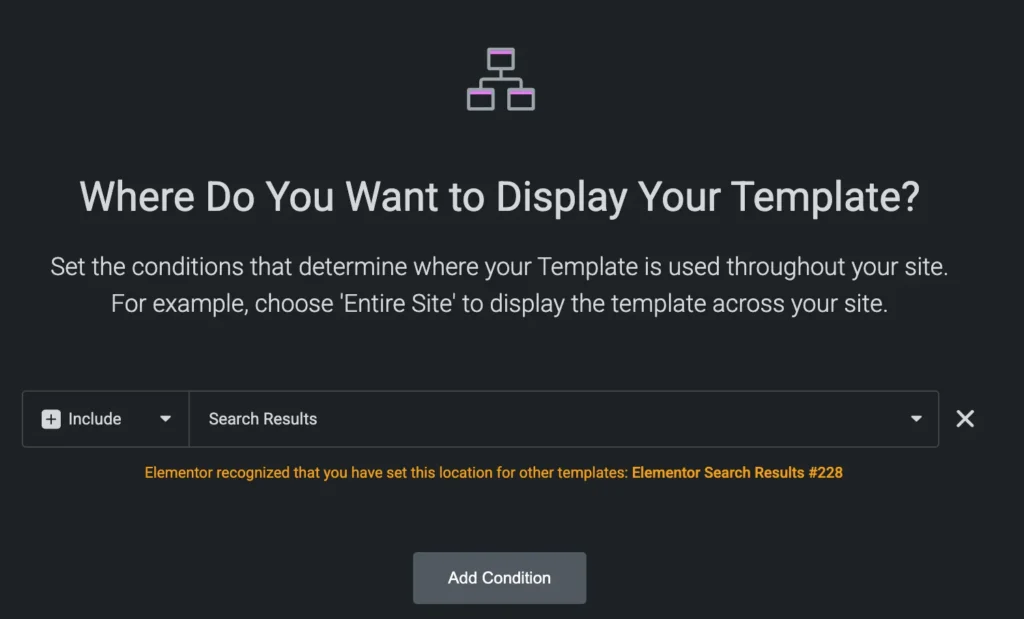
  • Click on the Publish button.
Display-Conditions
  • Set the display condition to IncludeSearch Results. This ensures the template is applied to all search results pages.​

4. Customize Styling and Layout

  • Utilize the Style tab to adjust typography, colors, spacing, and other design elements to match your site’s branding.
  • Ensure the layout is responsive and provides a seamless experience across different devices.​

Advanced Customizations

  • Highlight Search Terms: Use the free Highlight Search Terms plugin to emphasize the searched keywords within the results.
  • Exclude Specific Content: Implement custom code snippets to exclude certain post types or pages from appearing in search results.

Testing and Finalization

  • Preview the search results page by entering a search term to ensure the layout and functionality are as expected.
  • Make any necessary adjustments to improve user experience and design consistency.
  • Once satisfied, publish the template to make it live on your site.
Get Elementor Pro Just
₹499/ Year
Our Other Plugins

Importance of How to Create Search Results Pages in Elementor Pro

Creating a custom search results page with Elementor Pro is more than just a design upgrade—it’s a strategic move to enhance your website’s functionality and user experience. Here’s why it matters:

1. Improves User Experience

A well-designed search results page helps visitors quickly find what they’re looking for. By customizing the layout, you can display search results in a clean, organized, and intuitive way, keeping users engaged and reducing bounce rates.

2. Strengthens Brand Consistency

Default WordPress search pages often don’t match your site’s branding. With Elementor Pro, you can style your search results page to perfectly align with your site’s colors, fonts, and overall look—creating a seamless brand experience across every page.

3. Boosts Content Visibility

Custom layouts allow you to highlight specific content types—like blog posts, products, or services—making them more discoverable to users. You can even promote featured content or filter results based on relevance.

Conclusion: 

How to Create Search Results Page in Elementor Pro is a powerful way to enhance user experience and align search functionality with your site’s branding. By leveraging the Theme Builder, dynamic widgets, and advanced styling options, you can control exactly how users see and interact with search results.

Whether you’re aiming for a minimalist look or a content-rich layout, Elementor Pro gives you the tools to design it your way. And with added features like live search and keyword highlighting, your site can offer a polished and intuitive search experience that keeps visitors engaged and helps them find what they’re looking for faster.

Ultimately, this customization not only improves usability but also contributes to better content discovery and a more professional overall impression of your website.

How to Create Custom header and footer in Elementor Pro

If you want full control over your WordPress site’s layout, learning how to create a custom header and footer in Elementor Pro is a must. Elementor Pro’s Theme Builder gives you the freedom to build completely custom layouts without touching a single line of code.

What is Elementor Pro’s Theme Builder?

The Theme Builder is a powerful feature in Elementor Pro that allows you to override your theme’s default structure. Instead of relying on your WordPress theme’s header and footer, you can create your own from scratch—giving you complete creative control.


Steps to Create a Custom Header and Footer in Elementor Pro

1. Open Elementor’s Theme Builder

  • Go to your WordPress Dashboard.
  • Navigate to: Templates → Theme Builder.
Custom header and footer in Elementor Pro

Here, you’ll see options to create and manage your custom header and footer in Elementor Pro as well as templates for other areas like Single Post, Archive, and more.

Get Elementor Pro Just
₹499/ Year
Our Other Plugins

2. Create a Custom Header

  • In the Theme Builder, click “Add New” and choose Header.
New page 24E,THATTANKUTTAL NAGAR,RAYAPALAYAMPUDHUR,CHITHODE(TP),Erode,Tamilnadu-638 102.
  • Name your template (e.g., “Main Site Header”) and click Create Template.
  • Elementor may show you pre-made header blocks. You can select one or build from scratch.

3. Design Your Header

Using Elementor’s drag-and-drop editor, you can:

Header Example
  • Add a site logo, navigation menu, social icons, or call-to-action buttons.
  • Style each element with custom colors, fonts, and spacing.
  • Use responsive settings to optimize your custom header in Elementor Pro for mobile and tablet views.

4. Set Display Conditions

Once your header design is complete, click Publish. Elementor will prompt you to Set Display Conditions. This lets you choose where the header appears—across the entire site, on specific pages, categories, etc.

💡 Tip: To apply your custom header site-wide, select Entire Site as the condition.


5. Create a Custom Footer

  • Go back to the Theme Builder dashboard.
  • Click “Add New” and select Footer this time.
  • Name it (e.g., “Site Footer”) and click Create Template.

6. Design Your Footer

Add common elements like:

Footer Example
  • Copyright text
  • Footer menus
  • Social media icons
  • Newsletter opt-ins

Again, use Elementor’s styling options to match your site’s branding. A custom footer in Elementor Pro is the perfect place to include important links and info in a polished format.

7. Publish & Set Display Conditions

Just like with your header, click Publish, then set your display conditions (e.g., “Entire Site”).


Why Use a Custom Header and Footer in Elementor Pro?

  • Brand Consistency: Match your header/footer to your design vision.
  • Flexibility: Add or remove elements without code.
  • Responsive Design: Optimize for every device.
  • Dynamic Content: Easily integrate menus, logos, and custom fields.

Bonus Tips for Pro Users

  • Use the Nav Menu Widget for fully customizable menus.
  • Add Sticky Header Effects for better UX.
  • Include Dynamic Tags to pull in user-specific content.
Get Elementor Pro Just
₹499/ Year
Our Other Plugins

Conclusion

Creating a custom header and footer in Elementor Pro is one of the best ways to take full control over your WordPress site’s look and functionality. With Elementor Pro’s powerful Theme Builder, you can easily design and implement headers and footers that perfectly match your brand, improve user experience, and enhance overall site performance.

Whether you’re building a simple blog or a complex business website, Elementor Pro gives you the flexibility to go beyond the limitations of your theme. By following the steps in this guide, you can craft a professional, responsive, and fully customized site layout—without writing a single line of code.

Now that you know how to use Elementor Pro’s Theme Builder to design custom headers and footers, you’re one step closer to creating a website that truly stands out.